Friday 11 July 2014

Leo's Fortune APK+DATA

Leo's Fortune APK+DATA


Requires Android: 4.0 and Up

Version: 1.0

PLAY LINK: LEO'S FORTUNE

Download links:
TUSFILES:
LEO'S FORTUNE APK+DATA

HUGEFILES:

LEO'S FORTUNE APK+DATA

MEDIAFIRE:
LEO'S FORTUNE APK+DATA

ZIPPYSHARE:
LEO'S FORTUNE APK+DATA PART1
LEO'S FORTUNE APK+DATA PART2

DATAFILEHOST:
LEO'S FORTUNE APK+DATA PART1
LEO'S FORTUNE APK+DATA PART2

Install APK,place data folder in sdcard/android/obb/ and play.
LEAVE COMMENT AND SUPPORT US.

Saturday 5 July 2014

GTA SAN ANDREAS ANDROID CHEAT MOD APK (Unlimited Ammo+GOD MOD+Money) NO ROOT

GTA SAN ANDREAS ANDROID CHEAT MOD APK (Unlimited Ammo+GOD MOD+Money) NO ROOT


Version: 1.03


PLAY LINK: GTA SAN ANDREAS


Download Links:

GTA SAN ANDREAS MOD APK : Thanks to RIU for the MOD.

TUSFILES:


DATAFILEHOST:


ZIPPYSHARE:


NORMAL APK FILE: 

TUSFILES:


HUGEFILES:


MEGA:


USERSFILES:


TORRENT:


Call Of Warships World Duty MOD APK (Unlimited Credits)

Call Of Warships World Duty MOD APK (Unlimited Credits)


The game provides players with a huge naval fleet and grants an opportunity to take command of legendary vessels and fight for domination on the high seas. Each machine has its unique realistic combination of firepower, speed, armor, and endurance
The naval action game has several features to keep you entertained, including a straightforward and clear game interface, as well as easy-to-maneuver game controls.
Your mission is to take charge of a fleet of powerful and varied naval ships, taking to the rough seas to seek out and destroy your enemies in intense and bloody battles.
Enjoy it!
Features:
- Varied and powerful weapons could be used in any situation!
-Cutting edge 3D graphic!
-battleships in real history!
-Beautiful environments!
-Smooth and simple ship control system!
-Easy to learn hard to master!
-Exciting VFX effect!

Requires Android: 2.3 and Up
Version: 1.0


PLAY LINK: CALL OF WARSHIPS WORLD DUTY
Download Links:


TUSFILES:


CALL OF WARSHIPS WORLD DUTY MOD APK 


DATAFILEHOST:

CALL OF WARSHIPS WORLD DUTY MOD APK


ZIPPYSHARE:

CALL OF WARSHIPS WORLD DUTY MOD APK 

How to Root the Samsung Galaxy Gear 2

How to Root the Samsung Galaxy Gear 2


Released in April, the Samsung Galaxy Gear 2 has one major difference compared to its predecessor; the device is now running Samsung’s own Tizen instead Android.  But that’s not viewed as a deterrent by many as Samsung added in an infrared blaster (to control AV systems from the device), and moved the camera on to the device itself instead of the wristband, which enables users to get their own choice of wristbands.
What could make this Tizen-running Gear 2 better though is rooting it, as it will give you the ability to turn off the camera shutter sound and add in custom ringtones among other things.  And that is what the guide below will help you do.
Rooting is the process of gaining administrative rights on your Android device. Once we root our Android device, we can then make changes to it to customize it well beyond what it normally can do.
Once you have root access on your Samsung Galaxy Gear 2, you’ll be able to:
Remove apps that were preinstalled by your carrier/manufacturer from your device.
Free up storage space (because of the above benefit).
Increase battery life (apps that might have been running constantly can be removed).
Increase performance (after removing apps that are always running, the device will be less bogged down and run smoother).
Update to a new version of Android (by flashing a custom recovery/ROM, see the end of this procedure for more info on that).
Tons of other customizations when you use your new found administrative rights to flash a custom ROM (again, see the end of this procedure for more info on that).
Interested? Here’s how to root your Galaxy Gear 2:


 I.  Before You Begin

1.  This procedure is designed for the Samsung Galaxy Gear 2 (R380) running R380XXU0BNE5, R380XXU0BNDD and R380XXU0BND8 firmwares.  Do not try this if you are running the listed firmwares.
2.  Make sure you have the necessary drivers installed before you start.


II.  Necessary Downloads

1.  R380XXU0BNE5rootfs_root.tar (for R380XXU0BNE5 firmware) | R380XXU0BNDDrootfs_root.tar (for R380XXU0BNDD firmware) | R380XXU0BND8rootfs_root.tar (for R380XXU0BND8 firmware) [Links available in this post]
3.  Odin_v3.09.zip


II.  Rooting the Galaxy Gear 2

1.  Extract the Odin_v3.09.zip file you downloaded above to a folder on your desktop.
2.  From the extracted folder, double-click on Odin3 v3.09.exe to run the tool.
3.  Put your device into Download mode.  To do this, with the device off, press and hold the Home + Power + Volume Down buttons until you get to Download mode.
4.  Click on AP button in Odin, locate R380XXU0BNE5rootfs_root.tar (or the other ones, depending on the firmware you are running) you downloaded above and click on OK to load it on Odin.  The ID:COM field on Odin should now light up yellow and you should see the “ADDED!” message to signify that your device is connected and recognized properly.  If not, reinstall drivers and try again.
5.  Make sure that the Re-Partition and Flash Lock are unchecked; this is important as you might brick your device if these options are ticked!
6.  Click on Start.
7.  Once done, reboot your device.
All set! You have now rooted your Samsung Galaxy Gear 2!


How to Root the Samsung Galaxy Note 3 Neo

How to Root the Samsung Galaxy Note 3 Neo

While all the Galaxy Note series smartphones are enjoying root-access, how can we forget to root the Galaxy Note 3 Leo? Rooting your device will not only help you install root-only apps, but it’ll let you do many things you haven’t even thought of before. Here’s the procedure that teaches how you can gain root-access on your device and get started with flashing custom developments and so on.
Rooting is the process of gaining administrative rights on your Android device.  Once we root our Android device, we can then make changes to it to customize it well beyond what it normally can do.
Once you have root access on your Samsung Galaxy Note 3 Neo, you’ll be able to:
Remove apps that were preinstalled by your carrier/manufacturer from your device.
Free up storage space (because of the above benefit).
Increase battery life (apps that might have been running constantly can be removed).
Increase performance (after removing apps that are always running, the device will be less bogged down and run smoother).
Update to a new version of Android (by flashing a custom recovery/ROM, see the end of this procedure for more info on that).
Tons of other customizations when you use your new found administrative rights to flash a custom ROM (again, see the end of this procedure for more info on that).
Interested? Here’s how to root your Samsung Galaxy Note 3 Neo:


I. Before You Begin

1. This will void the warranty of your device. However, you can reinstate the warranty by unrooting your device if there’s any unrooting procedure available.
2. This only works for the SM-N750 variant of the device. To find out what variant you have, head to Menu > Settings > About phone and your model number should be listed there.
3. This procedure should only work on Windows based PCs.
4. You should have appropriate drivers installed on your PC. If you haven’t, download and install the latest drivers from the Samsung website to your PC.


II. Downloading Required Files

1. Download Odin and save it to your desktop.
Odin
2. Download CF-Root and save it to your desktop.
CF-Root
3. Download TWRP Recovery and save it to your desktop.


TWRP Recovery (Download the Odin version of the recovery, it should end with .tar extension)


III. Rooting the Samsung Galaxy Note 3 Neo

1. Extract files from Odin as well as CF-Root archives over to your desktop.
2. Double-click on Odin executable and it’ll launch.
3. Click on PDA and choose the CF-Root file you just extracted to your desktop.
4. Make sure Repartition is unchecked in the Odin.
5. Checkmark the boxes that say Auto Reboot and F. Reset Time.
6. Turn OFF your device.
7. Turn it back on by holding down Volume DOWN, Home, and Power buttons together.
8. Press Volume UP and you should be in Download mode.
9. Plug in your device to your PC using the USB cable.
10. One of the boxes in Odin should turn yellow indicating your device’s been recognized by your PC.
11. Hit Start in the Odin and it’ll start flashing the CF-Root on your device.
12. Once it’s been flashed, your device should automatically reboot.
13. You’re now rooted!
Your Samsung Galaxy Note 3 Neo is now rooted. You can now flash a recovery on it by following the following steps:


IV. Flashing a Custom Recovery on the Samsung Galaxy Note 3 Neo

1. Double-click on Odin executable and it’ll open.
2. Click on PDA and choose the TWRP Recovery (.tar) file available on your desktop.
3. Make sure Repartition is unchecked in the Odin.
4. Put a checkmark in the boxes that say Auto Reboot and F. Reset Time.
5. Turn OFF your device.
6. Reboot your device into Download mode. To do so, simply hold down Volume DOWN, Home, and Power buttons together.
7. Press Volume UP and you should be in Download mode.
8. Plug in your device to your PC via USB cable.
9. One of the boxes in Odin should turn yellow, which indicates your device’s been recognized by your PC.
10. Hit Start in the Odin and it’ll start flashing the recovery on your device.
11. When the recovery’s been flashed, your device should automatically reboot.
12. And you’re all set!
Wonderful! Your Galaxy Note 3 Neo is now rooted and has a custom recovery loaded on it. Your journey to customizing your device begins from here!


Friday 4 July 2014

How to Root an Android Device in One Click (Kingo Method)


How to Root an Android Device in One Click (Kingo Method)

Acposted iner How To's Acer Iconia A1-810 How To's Acer Iconia A1-811 How To's Acer Iconia A211 How To's Acer Iconia A501 How To's Acer Iconia B1-A71 How To's Acer Liquid E1 Dual V360 How To's Acer Liquid Z110 Duo How To's Acer Liquid Z2 How To's Acer Liquid Z3 How To's Alcatel How To's Alcatel One Touch D918 How To's Alcatel One Touch Evolve How To's Alcatel One Touch Fierce 1 How To's Alcatel One Touch Hero How To's Alcatel One Touch iDol S How To's Alcatel One Touch Idol X How To's Alcatel One Touch POP C5 How To's Alcatel One Touch Scribe Easy How To's Alcatel One Touch Snap LTE How To's Alcatel OT 991 How To's Alcatel OT 997D How To's Alcatel OT iDol How To's Alcatel OT iDol Ultra How To's Alcatel OT Scribe HD How To's Alcatel OT Star 6010 Silver How To's Alcatel POP C3 How To's Android Rooting How To's Asus How To's Asus MeMo Pad (ME172V) How To's ASUS MeMO Pad Smart ME301T How To's Asus PadFone Infinity 2 How To's ASUS Transformer Pad TF300TG How To's ASUS Transformer Prime TF700T How To's Featured HTC 920E How To's HTC Hero 200 How To's HTC How To's HTC One S (S3) How To's HTC Primotd How To's HTC Primotds How To's HTC Raider 4G How To's HTC Runnymede How To's Huawei A199 How To's Huawei C8650 How To's Huawei C8810 How To's Huawei C8812 How To's Huawei C8812e How To's Huawei C8813 How To's Huawei C8813D How To's Huawei C8813Q How To's Huawei C8815 How To's Huawei C8825D How To's Huawei C8950D How To's Huawei G520 How To's Huawei G520 T10 How To's Huawei G610C How To's Huawei HN3 How To's Huawei How To's Huawei P6 C00 How To's Huawei P6 U06 How To's Huawei T8620 How To's Huawei T8830 How To's Huawei T8830 Pro How To's Huawei T8833 How To's Huawei U8833 How To's Huawei U8860 How To's Huawei U9200E How To's Huawei U9500 How To's Huawei Y210C How To's Huawei Y210S How To's Huawei Y300C How To's Huawei Y320T How To's Huawei Y500 How To's Lenovo A390 How To's Lenovo A60 How To's Lenovo A630 How To's Lenovo A690 How To's Lenovo A800 How To's Lenovo A820 How To's Lenovo A830 How To's Lenovo A850 How To's Lenovo How To's Lenovo iDeaphone K860 How To's Lenovo K800 How To's Lenovo K900 New How To's Lenovo Lephone S560 How To's Lenovo P700 How To's Lenovo P700i How To's Lenovo P780 How To's Lenovo S720 How To's Lenovo S890 How To's LG How To's LG Optimus L3 E405 How To's LG Optimus L5 E610 How To's LG Optimus L5 E615 How To's LG Optimus L5 II Dual E455 How To's LG Optimus L9 P760 How To's LG Optimus LTE (LU6200) How To's LG Optimus LTE SU640 How To's Micromax A115 Canvas 3D How To's Micromax A57 Ninja 3.0 How To's Micromax A87 Ninja 4.0 How To's Micromax A88 How To's Micromax A90 How To's Micromax A90s How To's Micromax Funbook Infinity P275 How To's Micromax How To's Micromax Ninja A54 How To's Micromax Ninja A89 How To's Micromax Ninja A91 How To's Micromax Viva A72 How To's Micromax Viva A73 How To's Moto Defy Me 525 How To's Moto Defy Me 525+ How To's Motorola How To's Rooting and Jailbreaking Samsung Galaxy Tab 3 7.0 How To's Samsung How To's Samsung i699 How To's Samsung i879 How To's Samsung i9152 How To's Samsung T959 How To's Sony C1504 Xperia E How To's Sony How To's Sony Xperia TX (LT29i) How To's Sony Xperia Z Ultra C6802 How To's


Rooting is the process of gaining root access on a device. This allows us full access to all aspects of the device’s operating system. The most popular thing to do once you gain root access is to flash a custom recovery image. Custom ROMs, overclocking kernels, adding certain new features, etc. all require what is known as a custom recovery image. When an Android device ships from the manufacturer, it has a recovery mode built in. This is used to restore the device if it becomes unresponsive and to perform updates to the operating system. Once you have root access, however, we can replace this recovery image with our own custom recovery image that can, not only perform those same functions, but has a lot of added new features. One such new feature, is the ability to allow us to flash custom versions of the operating system (custom ROMs). These custom versions, created by talented third-party developers, can add new versions of the operating system, add features from other devices that aren’t normally available on your device, etc.
Besides that, you can also use our How to Remove Bloatware on your Android Device video to remove all those pesky apps and services the manufacturer and carrier put on your device that are slowing it down and taking up space. You don’t even need a custom recovery for that. Just follow this procedure and head to that one directly after.
With that bit of background on rooting, let’s discuss this method.
Every now and then a rooting method comes along that seems to work across a plethora of devices. And, every now and then when that happens, a developer creates a neat little program to make that rooting procedure automated. This is the case with the Framaroot method and WugFresh toolkit to name a few of the applications to come out recently. In addition to these, there is a new one that has appeared called Kingo. What’s great about this program is that it not only roots the device in one click (essentially) but it’ll actually find the appropriate drivers for it and set them all up before hand (a very troublesome step for most people). If you’re device is one that it supports, why not give it a try. Here’s how to root your Android device using the Kingo method:


I. Before You Begin

1. This only works on Windows since the rooting program is only for Windows.


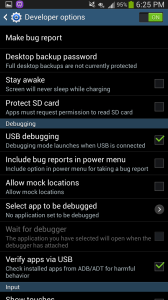
II. Enable USB Debugging.

1. On the Android device, go to Settings > General > About Device.

2. Repeatedly tap on Build Number until it says you are a developer.


3. Hit back and tap Developer Options.

4. Turn on USB
 Debugging.


III. Root Using Kingo App

1. Download Kingo. 


2. Double-click the exe to install Kingo.


3. Follow the prompts to install Kingo.


4. Wait for it to install the drivers and when it tells you to unplug the device, do so.


5. When it tells you to plug the device back in, do so.


6. Tap always allow and click OK on your device when prompted.

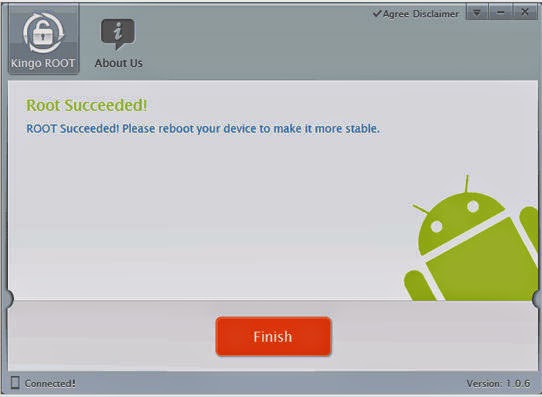
7. Click the Root button and wait for it to finish.


8. Once done, it’ll reboot and you are all done!


How to Access an Android Device if You Forget Your Pattern or Pin

How to Access an Android Device if You Forget Your Pattern or Pin


The chances are rare that you will forget your screen lock (pattern or PIN) and are locked out of your device if you are a constant user of your Android device like me but it happens, we know; it could be when you changed your PIN or pattern recently or because your kid decided that the pattern lock looked like a nice enough game to play with.  This guide is just for those times and will show you how to get past that screen lock and access your device.


I.  Prerequisites

1.  Your device needs to be connected to the internet for this solution to work; this could be a WiFi access point you have already added to your access point list or plain old internet provided by your mobile carrier.2.  You will need access to the Google account you have your phone linked to.  If you have forgotten your Google account password, then a hard reset is the only way to go, losing your data in the process.


II.  Installing Screen Lock Bypass and Using it

1.  Go to the web version of Google Play.
2.  Login with the Google account associated with your Android device.
3.  Install Screen Lock Bypass.
4.  Reboot your device.
You should now be able to access your home screen and everything else.  Please note that while the Screen Lock Bypass does not remove your PIN or pattern, it will give you access to your device so you can back up the necessary data; ultimately, a hard reset is the only way to go if you want to change the security settings.


III.  Backing up your Current Data

Now that you have access to your device, it’s better to back up the important data you’ll need after you hard reset your phone/tablet.  Here are some ways to back up some common components:
Contacts – This is already taken care of by Google if you have opted to sync your contacts with your Google account.
Messages – A good option for this is SMS Backup+; this app backs up your texts to gmail under a different label and can restore them after a hard reset.
Pictures and Video – These could be backed up to your PC by connecting your device in USB Storage Mode; this mode can usually be activated by selecting the type of connection from the notification area after you have connected your device.
Apps – Google usually takes of your apps (both paid and free ones) but just in case, look up File Expert and its app backup option for the same.

IV.  Hard Resetting your Device

A hard reset is usually done in two ways:

1.  Factory Reset by heading to Settings > Privacy > Factory Data Reset.

OR

2.  Hard Reset via Recovery Menu.  This usually involves holding certain keys when your device is being powered up and then selecting Wipe Data/Factory Reset in the Recovery Menu.  Look up the way to access Recovery Menu on your device or ask us and we’ll show you how!!
This is part of our Android How To’s. We have how to’s on rooting, loading ROMs, and tons of other tips and tricks for your specific device or for Android devices in general! For all of our Android How To’s, head here.


GT Racing 2 The Real Car Exp 1.3.0 MOD APK+DATA (Unlimited Money)

Batman Arkham Origins MOD APK+DATA (Unlimited Money)

  Batman Arkham Origins MOD APK+DATA (Unlimited Money)


Requires Android: 4.0 and Up

Version: 1.2.1


Download Links :-

Mod Apk :-

Datafilehost:

Mod Apk+data :-

TUSFILES:

HUGEFILES:

TORRENT:

ZIPPYSHARE:

Install APK,Place data folder in SDCard/Android/Obb/ and Play.
MOD APK ONLY